Wednesday, July 31, 2013

Denim shortscut!

Hello friends...this is our last week before our summer vacations, at last! Our spirit is high as we dream to spend the next weeks on a beautiful beach with good friends. I hope to get some tan and relax my mind from the past and furious winter. As we are in the middle of summer and the tempereature has risen, this week I am presenting an easy DIY denim pants refashion into a pair of super, stylish and fresh-looking denim shorts!


This project was really easy and quick. You will do it in no time, I assure you. So let's start.

Photo 1
All you need is a pair of denim pants, a lace, a ruler and a pair of scissors and pencil, of course...

Photo 2
First step is to cut a triangle from both side hips app. 10cm from bottom hem. A ruler and a pencil are very useful for this! 

Photo 3
Then we cut the pyramid we previously draw by pencil. 

Photo 4
We measure the lace ribbon we need for each side of our pyramid and we cut it. I also placed this lace ribbon all around the bottom hem because it looked nicer like this.

Photo 5
We carefully stitch the lace ribbon all around the bottom hem and our super denim shorts is ready to wear!

Your final work should look like this...You will notice a stitched flower in gold at the right side. This was made a long time ago with thick thread. This is a nice idea to refresh an old pair of denim pants. I kept it because it looked nice...You can try it, too! 


Many thanks to my model FKappou for posing! 

I hope you like it!

xxx
Tailor Spy


Tuesday, July 23, 2013

The lady in lace!

Hello friends!
It's been a while since my last post, I know, but I am back with a new amazing DIY project. This tutorial is so easy and fun and the outcome is also great! T-shirts are my favourite garments because you can transform them in a minute and in so many ways! This time I added this great lace in a plain cotton t-shirt! What a result! 


Photo 1
What you need is a cotton t-shirt which you can easily find everywhere. This is actually a men's t-shirt in size M. Women's t-shirt are usually more tight and I wanted the fitting to be loose. 

Photo 2
First we cut the hem around the neck and we shorten the sleeves by cutting 5-8cm from sleeve's hem. The original sleeves were too long!

Photo 3
We turn the t-shirt inside out and we stitch it from bottom hem up to the armole and sleeve. We repeat this proceed at the other side too. In this way we make the t-shirt a bit more tight. It is totally up to you! After you finish with the stitching, you must cut the excess fabric at the left and right.

 
Photo 4
Then we cut the bottom hem around 20cm below the armhole and we stitch the lace on the outter side of the hem. If you want, you can stitch the lace under the bottom hem. We keep aside the rest of the fabric for later. 

Photo 5
At this stage, the t-shirt should look like this. Last, you take the fabric we cut from bottom hem and we stitch it under the lace, this time. The t-shirt is ready! It is a romantic and elegant piece you can wear in the office or for a night out! Enjoy!


*Many thanks to my beautiful friend Fotini who accepted to be my model at this photo shoot. 

Kisses
Tailor Spy


Monday, July 8, 2013

CD necklace : wear the music!


Hey what’s up Diyers? Are you in the mood for a strong DIY? As you already know this year is all about accessories! The bigger the fancier! What a better way to use a scratched CD than make it a fabulous necklace? Turn the music loud and follow me to the dance floor

Photo 1
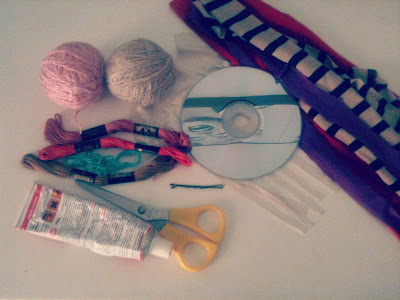
What you need: 
Old scratched CD
Threads in various colors
Glue for fabric
Scissors
Stripes of scrap fabric
Pieces of leather
Photo 2
                                                                     Photo 3

Photos 2 & 3

Cut the CD using the scissors in the middle. This will be the base of your necklace.
                                                                      Photo 4

                                                                      Photo 5
Photos 4 & 5

Spread the glue on the half surface of the CD and start turning and folding around the thread. Continue with another color the same process.


                                                                   Photo 6

                                                                    Photo 7
Photos 6 & 7

Once you have finished with the threads add some glue on the edges of the CD in order to glue the leather parts.


Photo 8
Start braiding your scrap fabric stripes to make the “chain”. I made two in each side to make it more impressive.


                                                                     Photo 9
                                                                   Photo 10  
Photo 9 & 10

When you have finished the braiding add some glue on the back side of the CD and cover the edges with some more leather pieces. Use the scissors and press it to glue faster.


Photo 11


Tie together with some fabric the braids and create two ribbons as clasp. You can make it as long as you like. The final result is big and loud kinda ethnic and colorful!


Love 

MikaLina