Friday, December 13, 2013

DIY: Christmas Party clutch!

Hello Friends!
We are 12 days away from Christmas! We are already in Christmas mood and we can't wait to gather with family and friends. Today we are showing you how to make a dazzling evening Christmas party clutch bag in less than an hour! This amazing clutch is what you need for a Christmas night out! 

Γεια σας φίλες μας!
Μας μένουν 12 ημέρες μέχρι τα Χριστούγεννα! Είμαστε ήδη σε Χριστουγεννιάτικη διάθεση και ανυπομονούμε να βρεθούμε με την οικογένειά μας και τους φίλους μας. Σήμερα θα σας δείξουμε πως να φτιάξετε ένα εντυπωσιακό βραδινό τσαντάκι σε λιγότερο από μία ώρα! Αυτό το απίθανο τσαντάκι είναι ό,τι χρειάζεστε για ένα Χριστουγεννιάτικο πάρτυ!


For the clutch you will need two pieces of different fabric. We used a silver fabric of mixed polyester and mohair quality for the outer part. For the inner part instead of a lining we used a thick denim fabric because it makes the clutch more stiff.

Για το τσαντάκι θα χρειαστείτε δυο ειδών υφάσματα. Εμείς χρησιμοποιήσαμε ένα ασημί ύφασμα από πολυεστέρα και μοχέρ για το εξωτερικό μέρος. Για το εσωτερικό αντί για φόδρα χρησιμοποιήσαμε ένα χοντρό ύφασμα τζιν.

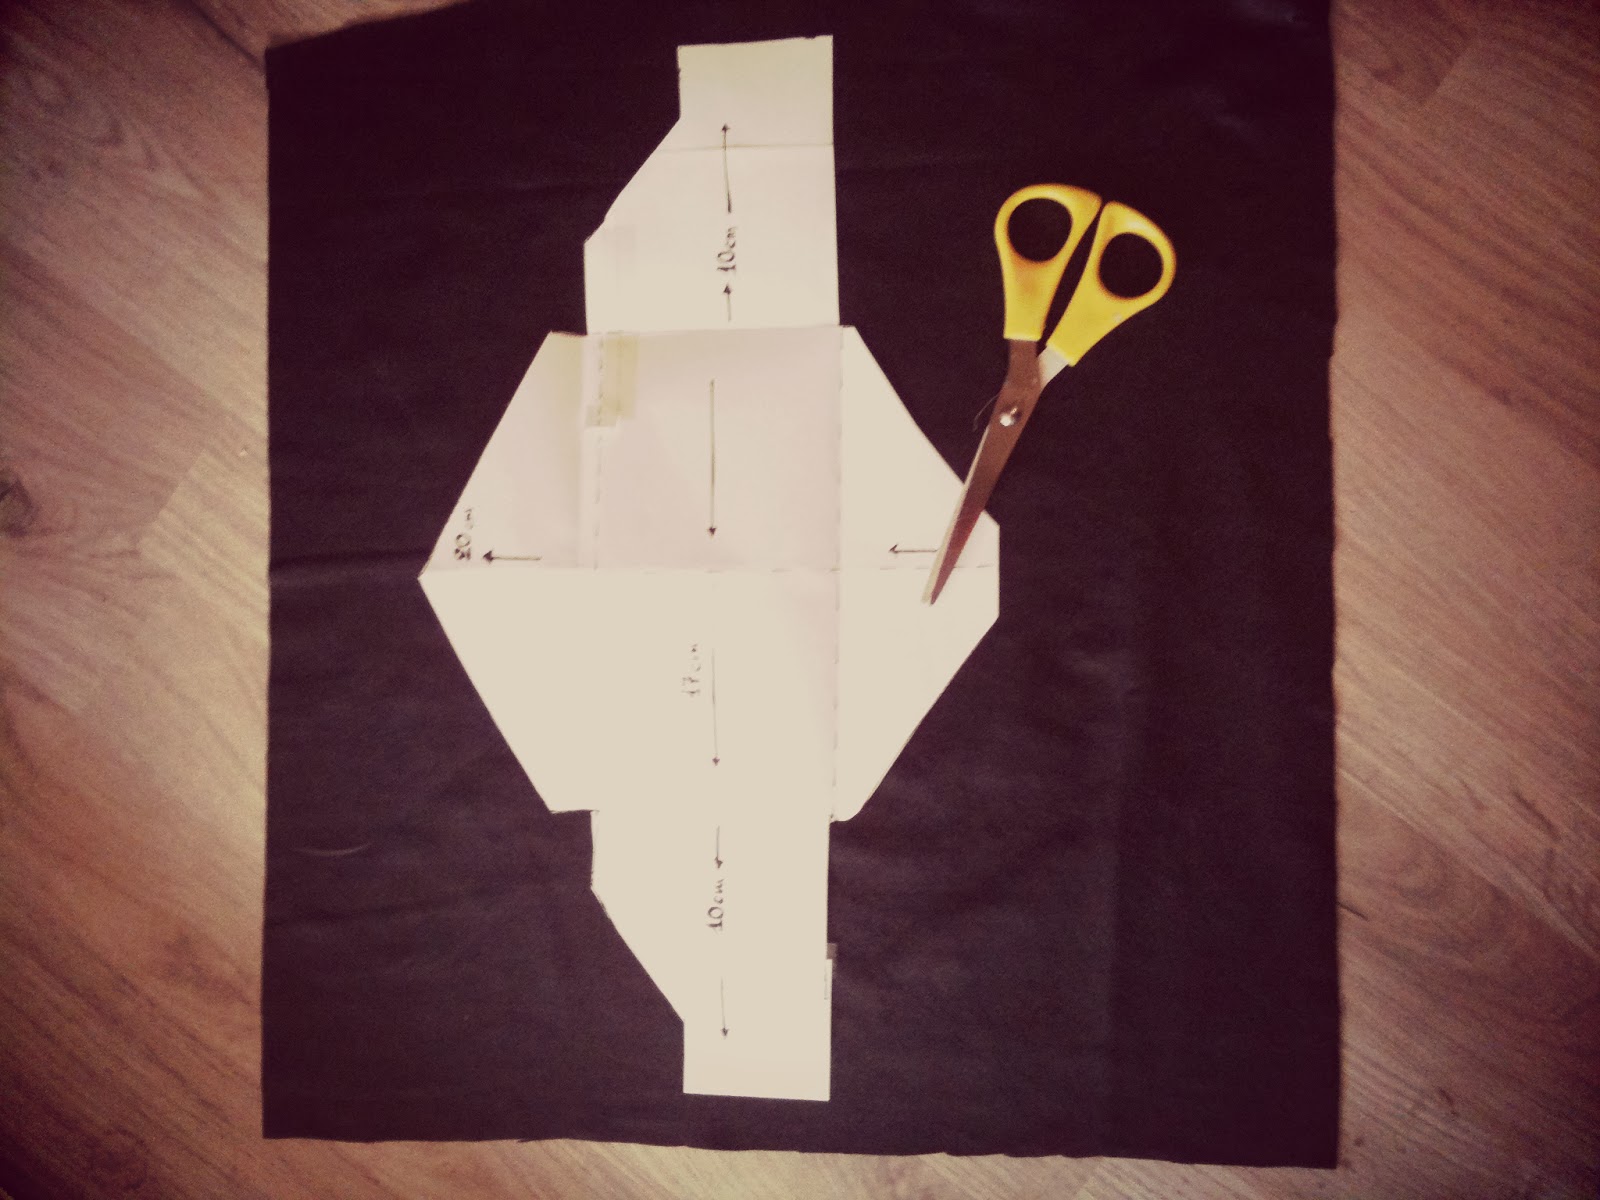
We place both fabrics facing one another and we cut them in the dimensions we want. Then we place the upper side of the silver fabric interfacing the denim's light blue side.

Τοποθετούμε τα δύο υφάσματα το ένα πάνω στο άλλο και κόβουμε ακριβώς στις ίδιες διαστάσεις. Έπειτα τοποθετούμε την καλή πλευρά του ασημί υφάσματος αντικριστά με την ανοιχτόχρωμη πλευρά του τζιν.

We sew with our sewing machine the two pieces of fabric leaving the one side open. After finishing the sewing, we turn it inside out until the outer side of the silver fabric appears.

Ράβουμε στην ραπτομηχανή γύρω γύρω αφήνοντας το επάνω μέρος ανοιχτό. Αφού τελειώσουμε το ράψιμο, γυρίζουμε το μέσα έξω μέχρι να εμφανιστεί η καλή πλευρά του ασημί υφάσματος.

Then we iron the side stitching very well. Now we have to sew the bottom side of the clutch. From the outer side of the silver fabric we fold the fabric up to the point we want and we pin it. It's time for sewing again! We sew both sides very well.

'Επειτα σιδερώνουμε καλά τις ραφές και στις δύο πλευρές. Τώρα πρέπει να ράψουμε το κάτω μέρος της τσάντας. Από την καλή μεριά του ασημί υφάσματος διπλώνουμε το κάτω μέρος στο ύψος που θέλουμε. Στερεώνουμε με μία καρφίτσα και πάμε πάλι στη ραπτομηχανή! Ράβουμε τις δυο ακριανές πλευρές πολύ καλά.

After sewing our clutch will look like this (see photo above from left). Now we will turn the inside out again and we will sew the finishing around the upper part. You fold the fabric carefully and you sew it. 

Μετά το ράψιμο το τσαντάκι μας θα είναι όπως επάνω στην πρώτη φωτογραφία από αριστερά. Τώρα θα γυρίσουμε το μέσα έξω πάλι και θα πάμε να ράψουμε το τελείωμα στο επάνω μέρος. Το διπλώνετε προσεκτικά και το γαζώνετε.

Now let's go decorate our clutch with a nice motif. We place this lovely heart shaped motif onto a similar fabric with the clutch's outer fabric but in a more dark color. We sew it carefully (by hand) our motif onto the second fabric and then we cut it around in a heart shape. Then we sew it on our bag's flap (by hand again).

Τώρα πάμε να φτιάξουμε το μοτιφ μας για να στολισουμε το 'καπάκι' της τσάντας μας. Τοποθετούμε αυτό το όμορφο μοτίφ καρδιάς πάνω σε ένα παρόμοιο ύφασμα με αυτό της τσάντας μας, σε πιο σκούρα απόχρωση όμως. Το ράβουμε προσεκτικά γύρω γύρω και το κόβουμε ακολουθώντας το σχήμα της καρδιάς. Έπειτα το ράβουμε στο χέρι πάνω στο ΄καπάκι' της τσάντας μας.

This is the clutch we made! We loved the result! You can make similar clutches as a gift for your friends. We are sure they are going to love them! It will be a handmade gift they will appreciate. 

Αυτό είναι το τσαντάκι μας! Το αποτέλεσμα μάς άρεσε πολύ! Μπορείτε να φτιάξετε παρόμοια τσαντάκια και να τα κάνετε δώρο στις φίλες σας! Είμαστε σίγουρες ότι θα το εκτιμήσουν αφού θα είναι και από τα χεράκια σας...

Many Kisses to all of you!

Πολλά φιλάκια σε όλες σας!

Tailor Spy

Thursday, December 5, 2013

Friendship style watch strap!

Hello friends!
Last weekend I came up with this brilliant idea. I have had this small but elegant watch from Follie Follie kept in my drawer for years now. From time to time I changed its leather strap but always felt that something was missing so I've worn it only a few times. Lately I have a mania with knitted bracelets, so I figured it would be really nice if, instead of a classic leather strap, I embellished the watch with a friendship bracelet style strap. So, I chose the chevron pattern which looks so nice. I just love the new look I gave to this simple watch. I love wearing it all day long and everybody is asking me where did I find this lovely jewellery watch.


 You can find the chevron pattern at http://friendship-bracelets.net/patterns2.php 

So what do you think?

xoxo
Tailor Spy 

Monday, November 4, 2013

Handmade wedding pouch with embroidery!

Box made by http://elenartista.blogspot.gr/
Hello friends!
It's been a while since we've posted anything in our blog lately but we have our hands full planning a beautiful wedding in May...For this reason we decided to post a wedding DIY for all the girls who dream of a totally DIY wedding. In Greece it is used to give to all guests a wedding pouch with sugared almonds after the ceremony. Wedding pouches are a wedding "must" and they can be found in a variety of shapes, from a tulle pouch to a small jar or anything you can imagine. Today we will show you how to make a classic wedding pouch of crep-de-chine for your dreamy wedding. 


What you will need is a piece of a good quality fabric such as satin or crep-de-sin. Also, you will need some embroidery, pins, scissors etc. 

Take a ruler and draw the pattern of the pouch. Mine was 15x12 cm. Grab your scissors and cut it.
Turn the piece of fabric on the other side and your embroidery up side down. Carefully stitch the embroidery on the upper side as shown in the photo.
Now after stitching the embroidery turn the piece of fabric on the front side. This is how it will look like. 
Repeat the same process on the other piece of fabric. You will end up with two pieces. Cut the excess embroidery and lets proceed to stitching.
Start your stitching from the embroidery. Stitch both sides and the bottom.
Don't forget to finish your seam with a zigzag seam.
Fill your wedding pouch with yummy sugared almonds and wrap it around with the ribbon that matches with the colors of your wedding. Here, I used a see-through ribbon for a more classy touch. The result is a romantic wedding pouch that will impress your guests.
For the photo shoot I used this lovely heart shaped box made by http://elenartista.blogspot.gr/

 and they lived happily ever after...

Kisses
Tailor Spy


Friday, October 11, 2013

DIY: classy mini wallet-clutch!


Except my passion for jewelry, I must admit I am also a wallet addict! For the days that you want to go shopping without carrying a bag that is heavy and not practical, the mini clutch that I will show you, will give you style and comfort. You can carry your phone, your keys and only the absolute necessary things that you need. Follow the simple instructions to make your own now!!

Pic 1
You will need:
Fake leather fabric
Studs, tassels
Scissors
Paper
Ruler 
Picture 2


Picture 3
Pic 2-3
Take a paper and start by making your pattern. The idea is a basic envelope. Measure with your ruler the distance of every point and you will create an open paper envelope. Wrap it to check if the shape is OK.

Picture 4
Picture 5
Pic 4-5
Place the fabric on a steady surface and start cutting the shape of the pattern

Picture 6
Pic 6
Now starts the fun part. With the studs and pliers start decorating your wallet .Close the central button-stud with pliers and if you want you can add some fabric glue in the inner joints.


Pic 7
Ready! I have made also another one with the same technique and pattern. If you want to make them bigger you can just adjust the size of the pattern in a bigger scale! Super easy and fun this wallet is everything you need for a relaxed shopping day!

xxx
MikaLina

Tuesday, September 24, 2013

Autumn rose ring!

Happy Autumn to everyone! We are back with more DIY projects you will love! Stay tuned...


A breezy afternoon at my beach house watching the autumn leaves falling from the trees, I immediately started collecting my materials from things that was already in the house and with a few simple stuff and imagination I created this simple and chic rose ring..!
Let's start!


Photo 1
What you need: 
Pliers
Scissors
Ribbons
Candle
Beads
Wire
Silicone gun (hot glue)

Photos 2-3-4
Measure your finger by passing the wire around 4-5 times. Secure the end by making a knot using your pliers.


Photos 5-6-7
Cut in the shape of a flower petal various ribbons in any colors you like. Light your candle and gently pass the edges through the flame. Attention! only the perimeter! At the end the petals will have a 3D like effect.


Photos 8-9
Cut some more wire and start passing through your petals. Once you have placed them all, secure the end with a bead


Photos 10-11
Use the hot glue gun and spread the glue around the base of your ring. Fold around the ribbon (i chose pink for contrast) and gently press to secure the edges. Add a big drop of glue and at the same time "tie" the flower with extra wire.
I combined it with my favorite Berschka rings for a more dramatic look and wore it with my jeans and a white top. With this technique you can also create flowers for many different occasions. As hair accessories and even as a pin for your dresses and tops!

Good luck!

xxx
Mikalina